It's Better to Give Than To Receive
Everyone who actively pursues Living Large on Less knows that giving is truly better than receiving, but what to give can be a real-life challenge when financial resources are less. What's a party girl/boy to do? LOOK NO MORE! We've got some easy-to-create, easy-on-the-budget gifts for every taste, style, and occasion.
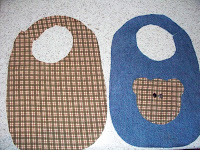
"Let's start at the very beginning, a very good place to start" (Are you hearing the song Do-Re-Mi from the Sound of Music yet?) Anyway...baby showers are quite possibly the perfect opportunity for creative gift-giving. The bibs shown in the pictures were not only fun, fun, fun to create, they were also economical. Using clean blue jeans no longer worn, the chosen pattern was placed on the largest section of the jean leg and cut out. A flannel remnant (usually reduced in price at fabric stores) worked perfectly for the back of the bib. One thing to keep in mind when cutting out the bib is that if the right side of the denim was facing up when being cut, the wrong side of the flannel needs to be facing up when at its turn. This enables the right sides of each fabric to show. (Experience is the best teacher.) Embellishments and snaps were added at this point. It would be a good idea to pay extra attention to the correct placing of snaps. (more experience) Once embellishments and snaps were complete, the front and back of the bib were placed together back to back or wrong sides facing. At least a 1/2 inch seam was sewn along the outside edge of the bib. Being careful not to cut through the stitching, small cuts were made approximately every 1/2 inch around the bib's outside perimeter. A quick run through the washer and dryer to begin ravelling the edges, and the bib is complete. Total time spent: approx. 1 hour.
Here are some other embellishment ideas:

 A complete gift set could be fashioned by adding a flannel receiving blanket and burp cloths.
To create the receiving blanket, take two one-yard pieces of flannel. Matching pieces could be used, but I personally prefer the look coordinating fabrics offer. Placing right sides of fabrics together, pin edges and sew 1/2 inch seam around perimeter leaving small section open for turning. Remove pins. On each corner cut point of tip off. Doing this helps the blanket corners be sharper when turned right side out. Now, turn the blanket right side out and smooth out neatly, I used an iron. Using an invisible stitch close the opening that was used for turning. The blanket can be given as is at this point, but I prefer to stitch around the edges using a 1/2 seam measurement. Decorative stitching is a fun touch for this. Monograms, embroidery, or other embellishments could be added to one side of the flannel before stitching together if desired. I prefer my baby blankets to be as soft and smooth as possible so I choose not to embellish the blankets, but this is strictly a matter of preference as long as one side of the blanket is free of embellishment so that baby isn't bothered. It might be tempting to skimp on the fabric a bit and use less than a full yard for each side. Please don't do this unless it's absolutely necessary. As a matter of fact, if I didn't have enough of one fabric, I would piece together what I did have into a quilt-like piece just to have an entire yard-sized blanket. The larger size really is that wonderful. Nursing mothers are able to discreetly feed even older babies without the concern of exposure, and the child can continue using the blanket for a number of years. My youngest son is two and still adores the comfort of his blankie that a friend gave him. Once a mother has used the larger size, she'll never go back to the smaller, barely cover the baby, ones available in stores again.
Matching burb cloths utillize the same construction technique as the bibs. Cut out two sides (remember to cut out with the opposite sides of the fabrics facing up) of fabrics that match and/or coordinate with your blanket(s) and bib(s). How these burp cloths are sewn up however will be a personal choice. They could be sewn as the bibs with wrong sides together using a 1/2 inch seam around the edges and the edges clipped for fraying OR...a smooth edge could be made by placing right sides together and sewing around the outside perimeter. If sewing a smooth edge, a small opening for turning will need to be left just as there was in the blanket. The cloth would then be turned right side out and the opening shut up with an invisible stitch. As in the blanket, a finishing stitch around the outside would be an optional, but nice touch.
Are you ready for the perfect "little homemaker/chef" gift? We have it! A nightstand turned kitchen!
Being short on both time and space in today's post, we wish to direct you to the many ideas, pictures, and tips abounding on the world wide web. Simply type homemade play kitchen into the search engine of your choice, we use google, and be ready for amazement. There are some intensely creative individuals out there. Here are pictures of our four-year-old homemaker's new kitchen. Her little brother enjoys cooking now too:)


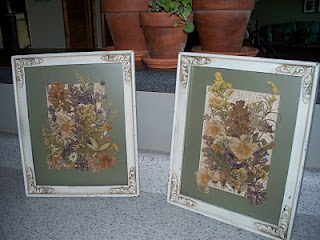
Last but certainly not least, we have a brand, new gift idea! This gift is not only economical to make and beautiful, it is appropriate for any party. If you were to purchase these handcrafted works of art in a boutique or store, your funds would be drastically reduced. Creating them yourself, the only thing spent may be your time. Using picture frames that had been given an aged look with white paint and stain, a pre-cut photo matte we already had on hand was backed by a piece of patterned cardstock taken from the scrapbooking tote. By using a piece of cardstock only slightly larger than the opening we were able to utilize a smaller piece of cardstock. This enabled us to reserve our full sheets of paper for other uses. Now for the fun part! Out came our stash of pressed wildflowers. Flowers were selected and laid out on the matte. Once the flowers had been arranged to satisfaction, they were attached to the cardstock and matte with adhesive. The "picture" was set up high, away from curious fingers, to dry. After the adhesive was thoroughly dry, the pictures were inserted into the frames. Total time: 30-45 min. You may want to make a some for yourself. This would also be a lovely way to preserve memories from a special occasion. Pressed flowers aren't the only frame-worthy material that would work for this gift. Sand, flat shells, leaves, grasses, pebbles, lace doilies, handkerchiefs, music, brochures, ticket stubs, badges, as you can see the possibilities abound.
NOTE: Hot glue is not recommended for use with delicate pressed flowers.
Are you ready to party yet? Each one of today's gift ideas can be personalized in a myriad of ways. Whether your taste is modern, simple, homespun, contemporary, shabby chic, or antique, these gifts can be created using materials to appeal to your taste. Not only that, but each idea can be put together using items already on hand, making them budget friendly as well. Lovely for Less.
Our week of partying is half way over---and I still haven't figured how to turn on the music. Are you getting hungry or thirsty yet? Me too. Don't leave us yet. The food joins the fun tomorrow! Best of all, we won't need to spend hours and hours in the kitchen or hundreds of dollars to put together the perfect party spread. See you tomorrow!
Other posts in the Living Large on Less archives contain even more ideas for easy to fashion gifts. Please feel free to stroll through all of the older posts. One never knows what they will discover on little strolls through the archives.
"Let's start at the very beginning, a very good place to start" (Are you hearing the song Do-Re-Mi from the Sound of Music yet?) Anyway...baby showers are quite possibly the perfect opportunity for creative gift-giving. The bibs shown in the pictures were not only fun, fun, fun to create, they were also economical. Using clean blue jeans no longer worn, the chosen pattern was placed on the largest section of the jean leg and cut out. A flannel remnant (usually reduced in price at fabric stores) worked perfectly for the back of the bib. One thing to keep in mind when cutting out the bib is that if the right side of the denim was facing up when being cut, the wrong side of the flannel needs to be facing up when at its turn. This enables the right sides of each fabric to show. (Experience is the best teacher.) Embellishments and snaps were added at this point. It would be a good idea to pay extra attention to the correct placing of snaps. (more experience) Once embellishments and snaps were complete, the front and back of the bib were placed together back to back or wrong sides facing. At least a 1/2 inch seam was sewn along the outside edge of the bib. Being careful not to cut through the stitching, small cuts were made approximately every 1/2 inch around the bib's outside perimeter. A quick run through the washer and dryer to begin ravelling the edges, and the bib is complete. Total time spent: approx. 1 hour.
Here are some other embellishment ideas:
- buttons & bows (make certain buttons are extra secure)
- iron on appliques matching baby's colors
- bandana and pockets with pearl snaps for cowboy/cowgirl look
- embroidery of choice
- monogram of baby's name or initials


To create the receiving blanket, take two one-yard pieces of flannel. Matching pieces could be used, but I personally prefer the look coordinating fabrics offer. Placing right sides of fabrics together, pin edges and sew 1/2 inch seam around perimeter leaving small section open for turning. Remove pins. On each corner cut point of tip off. Doing this helps the blanket corners be sharper when turned right side out. Now, turn the blanket right side out and smooth out neatly, I used an iron. Using an invisible stitch close the opening that was used for turning. The blanket can be given as is at this point, but I prefer to stitch around the edges using a 1/2 seam measurement. Decorative stitching is a fun touch for this. Monograms, embroidery, or other embellishments could be added to one side of the flannel before stitching together if desired. I prefer my baby blankets to be as soft and smooth as possible so I choose not to embellish the blankets, but this is strictly a matter of preference as long as one side of the blanket is free of embellishment so that baby isn't bothered. It might be tempting to skimp on the fabric a bit and use less than a full yard for each side. Please don't do this unless it's absolutely necessary. As a matter of fact, if I didn't have enough of one fabric, I would piece together what I did have into a quilt-like piece just to have an entire yard-sized blanket. The larger size really is that wonderful. Nursing mothers are able to discreetly feed even older babies without the concern of exposure, and the child can continue using the blanket for a number of years. My youngest son is two and still adores the comfort of his blankie that a friend gave him. Once a mother has used the larger size, she'll never go back to the smaller, barely cover the baby, ones available in stores again.
Matching burb cloths utillize the same construction technique as the bibs. Cut out two sides (remember to cut out with the opposite sides of the fabrics facing up) of fabrics that match and/or coordinate with your blanket(s) and bib(s). How these burp cloths are sewn up however will be a personal choice. They could be sewn as the bibs with wrong sides together using a 1/2 inch seam around the edges and the edges clipped for fraying OR...a smooth edge could be made by placing right sides together and sewing around the outside perimeter. If sewing a smooth edge, a small opening for turning will need to be left just as there was in the blanket. The cloth would then be turned right side out and the opening shut up with an invisible stitch. As in the blanket, a finishing stitch around the outside would be an optional, but nice touch.
Are you ready for the perfect "little homemaker/chef" gift? We have it! A nightstand turned kitchen!
Being short on both time and space in today's post, we wish to direct you to the many ideas, pictures, and tips abounding on the world wide web. Simply type homemade play kitchen into the search engine of your choice, we use google, and be ready for amazement. There are some intensely creative individuals out there. Here are pictures of our four-year-old homemaker's new kitchen. Her little brother enjoys cooking now too:)


Last but certainly not least, we have a brand, new gift idea! This gift is not only economical to make and beautiful, it is appropriate for any party. If you were to purchase these handcrafted works of art in a boutique or store, your funds would be drastically reduced. Creating them yourself, the only thing spent may be your time. Using picture frames that had been given an aged look with white paint and stain, a pre-cut photo matte we already had on hand was backed by a piece of patterned cardstock taken from the scrapbooking tote. By using a piece of cardstock only slightly larger than the opening we were able to utilize a smaller piece of cardstock. This enabled us to reserve our full sheets of paper for other uses. Now for the fun part! Out came our stash of pressed wildflowers. Flowers were selected and laid out on the matte. Once the flowers had been arranged to satisfaction, they were attached to the cardstock and matte with adhesive. The "picture" was set up high, away from curious fingers, to dry. After the adhesive was thoroughly dry, the pictures were inserted into the frames. Total time: 30-45 min. You may want to make a some for yourself. This would also be a lovely way to preserve memories from a special occasion. Pressed flowers aren't the only frame-worthy material that would work for this gift. Sand, flat shells, leaves, grasses, pebbles, lace doilies, handkerchiefs, music, brochures, ticket stubs, badges, as you can see the possibilities abound.
NOTE: Hot glue is not recommended for use with delicate pressed flowers.

Are you ready to party yet? Each one of today's gift ideas can be personalized in a myriad of ways. Whether your taste is modern, simple, homespun, contemporary, shabby chic, or antique, these gifts can be created using materials to appeal to your taste. Not only that, but each idea can be put together using items already on hand, making them budget friendly as well. Lovely for Less.
Our week of partying is half way over---and I still haven't figured how to turn on the music. Are you getting hungry or thirsty yet? Me too. Don't leave us yet. The food joins the fun tomorrow! Best of all, we won't need to spend hours and hours in the kitchen or hundreds of dollars to put together the perfect party spread. See you tomorrow!
Other posts in the Living Large on Less archives contain even more ideas for easy to fashion gifts. Please feel free to stroll through all of the older posts. One never knows what they will discover on little strolls through the archives.
